Describes the installation and usage of the Jalopy Eclipse plug-in. Eclipse is an open platform for tool integration built by an open community of tool providers. Operating under an open source paradigm, with a common public license that provides royalty free source code and world wide redistribution rights, the Eclipse platform provides tool developers with ultimate flexibility and control over their software technology.
Please note that the plug-in also supports other Eclipse based products, like IBM Websphere Application Developer (WSAD), IBM Rational Application Developer (RAD), JBoss Developer Studio, CodeGear JBuilder, Genuitec MyEclipse etc.
Explains the steps involved to install the Eclipse plug-in.
The plug-in requires Eclipse 3.0 or later. See Section 1.1, “System requirements” for the basic requirements to run Jalopy.
The plug-in comes as an executable Jar Archive (JAR) that contains a graphical setup wizard to let you easily install the software. Wizard installation is highly recommended and explained in detail in Section 1.3, “Wizard Installation”.
If you would rather install the plug-in manually, you have to decompress and copy the appropriate files into the different application and/or settings folders. To decompress the contents of the installer JAR, you can often use the build-in support of your file manager (e.g. Nautilus) or any other software that can handle the ZIP compression format (e.g. 7Zip, WinZip or Stuffit Expander). If you don’t have access to one of the convenience tools, you might resort to the jar command-line application that ships with your Java distribution.
When you’re upgrading from a prior version and want to keep your settings, first
copy or rename the current Jalopy settings directory to match the version number
of the new release. For instance, if your current settings directory is
C:\Users\John Doo\.jalopy\1.9
and you’re about to install Jalopy 1.9.4, either copy the directory
contents or rename it to
C:\Users\John Doo\.jalopy\1.9.4.
Make sure Eclipse is not running and remove any present
com.triemax.jalopy_1.9.4 directory
in your Eclipse plugin folder. This folder is usually located in the root directory of
your Eclipse installation, e.g. C:\Program Files\Eclipse\plugins\.
Copy the Jalopy plug-in folder
com_triemax.jalopy_1.9.4
from the temporary directory into the Eclipse plugin folder. Then place
the two JAR files jalopy-1.9.4.jar
and jalopy-eclipse-1.9.4.jar
from the temporary directory into the Jalopy plug-in folder.
Although Jalopy ships with sensible default settings (mimicking the Sun Java coding convention), you most likely want to configure the formatter to match your needs (adding copyright headers, tune Javadoc handling and the like). For such, Jalopy provides a configuration tool that lets you interactively craft and customize the code convention settings.
The Jalopy preferences are available through the Eclipse preferences dialog. In order to configure Jalopy, on Mac OS X you use Eclipse → Preferences... from the global Menubar and select the Jalopy item on the left pane to display the main preferences page. On other platforms, the dialog is available through Window → Preferences... from the application menu. In order to quickly locate the item, you might want to enter “Jalopy” as the filter text in the search field at the top of the left pane.
The main preferences page lets you manage your Jalopy profiles. A profile stores the actual code convention that defines the formatting style, as well as user-specific data like file and dialog histories. You can edit, add, remove, activate, map and share any number of profiles. For a detailed explanation of the available actions, please refer to Section 2.1.1.1, “Main window” that provides generic information about the configuration dialog that applies to all provided IDE plug-ins.

Jalopy profiles are shared for the local user and not workspace specific. This allows the settings to be reused across different applications and furthermore enables your team to easily work with different tools while still enforcing the same source code style.
Due to technical restrictions it is currently not possible to edit profiles from within Eclipse when running on Mac OS X. When using Mac OS X, you need to invoke the Jalopy preferences dialog from outside Eclipse. Simply install the Console plug-in and invoke the dialog as described in Section 5.2, “Configuration”. Configure your code convention and afterwards export it to a file. From within Eclipse you can then import this configuration or maybe even better, enable synchronization to automatically pick up changes to your central configuration
Lets you configure how runtime messages are displayed. The Messages preferences are workspace specific and not stored as part of a Jalopy profile. You can chose between two different views.
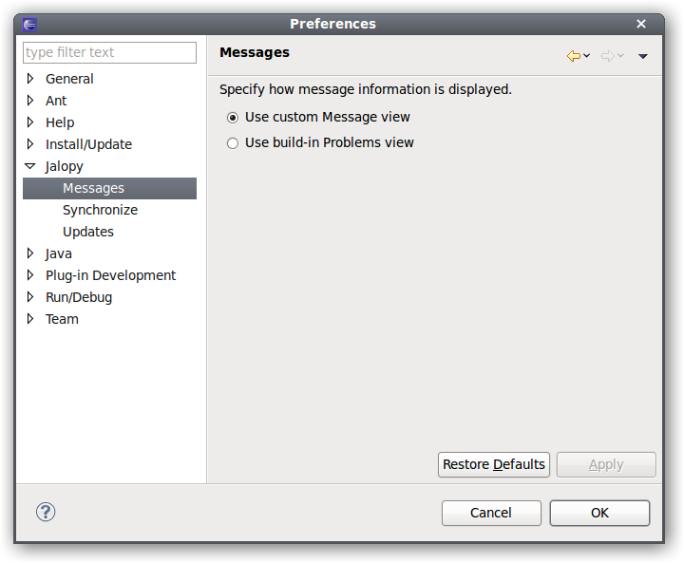
Use custom Message view
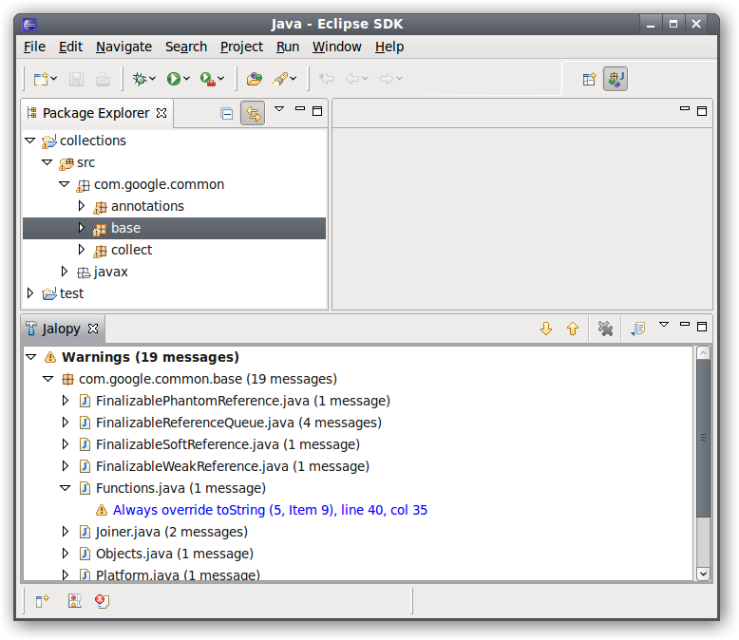
The custom Jalopy message view uses a tree-based viewer that is optimized for displaying large amounts of messages in an easily navigatable format.
Messages can be grouped by severity and/or package name via the pull-down menu on the upper right of the view to ease navigation. The severity level is also color-coded. Errors are displayed in red, warnings in blue. Elements are further annotated with icons to indicate their type. As a convenience, you can link the Message view with the active editor. Linking means that whenever an editor is selected, the Message view automatically jumps to the first message of the corresponding file, if any. Clicking on a message will open the corresponding file or activate the corresponding editor. If the message carries position information, the cursor will jump to this location.
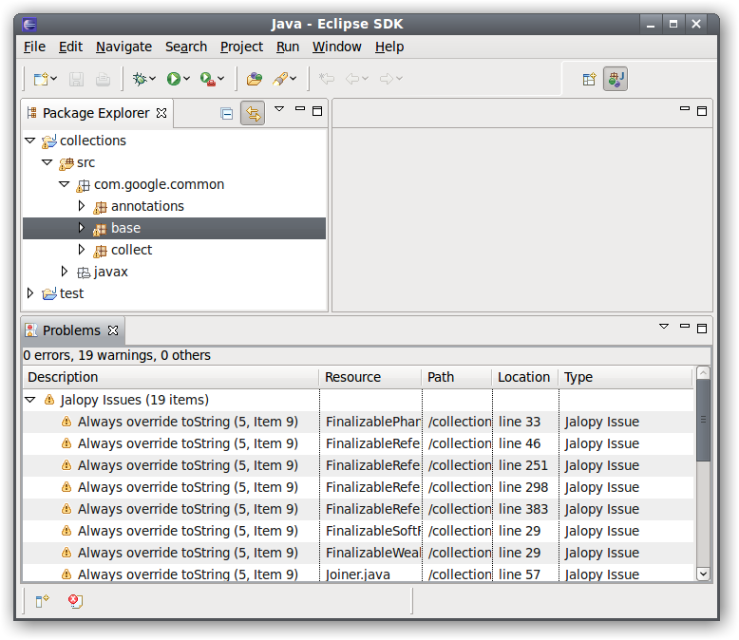
Use build-in Problems view
It’s also possible to have messages displayed in the standard Eclipse Problems view if that better suits your working habits. Jalopy uses the custom type “Jalopy Issue“ that you might use to configure a custom filter configuration for the view.
The Synchronize preference page lets you specify an external settings file with exported code conventions to automatically synchronize with in order to keep your local settings always up-to-date. The Synchronize preferences are workspace specific and not stored as part of a Jalopy profile.
In the text field you can enter the resource path to the settings file you plan to synchronize with. This should usually be the URL of a shared server. To browse for local files, you can press the Browse... button and open a file dialog.
You can provide the resource path right during installation as described in Section 1.3.6, “Configure plug-in Defaults”. This way individual developers are not required to configure anything at all on their machines
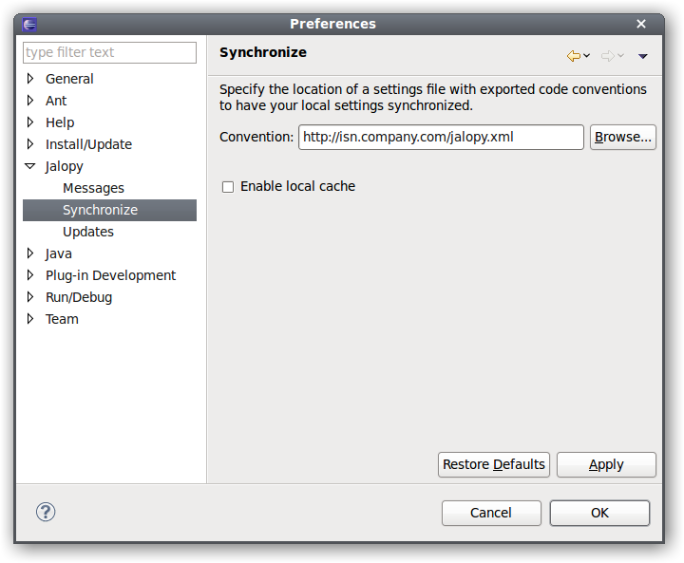
Enable local cache
By default, Jalopy checks the specified settings file for changes each time it is about to format. This can be prohibitive when the code convention sits on a server without fast network access. In order to avoid long delays in such situations, you can enable local caching. Jalopy then only checks once per day for changes.
The Update preference page lets you configure automatic update checking and notification. Automatic update checks for and informs about new releases. The Update preferences are workspace specific and not stored as part of a Jalopy profile.
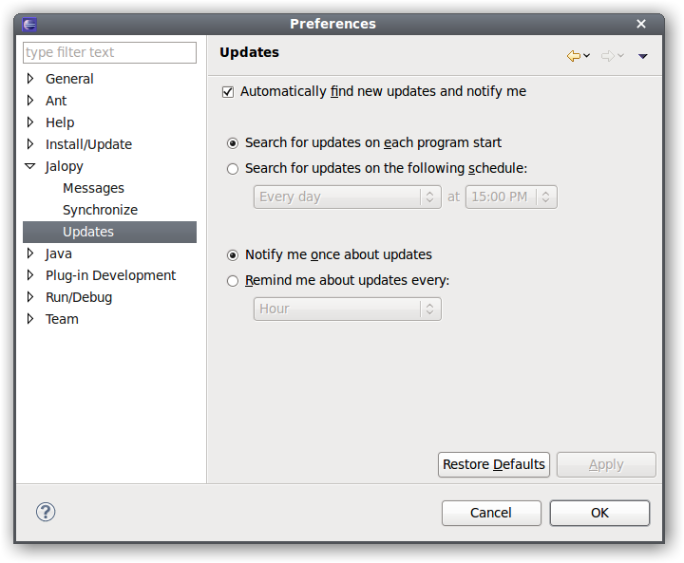
Automatically find new updates and notify me
To enable automatic update notification, check this option. When disabled, you won’t ever be notified about updates.
Search for updates on each program startup
When selected, update checking is performed only once during each session—on application startup.
Search for updates on the following schedule
When selected, you can specify day and hour when update checking should be performed periodically.
Notify me once about updates
When selected, the update notification appears only once during a session.
Remind me about updates every
When selected, you can define the time interval when update notification should remind you about updates.
You can define whether the IDE plug-ins should check for updates right during installation as outlined in Section 1.3.6, “Configure plug-in Defaults”
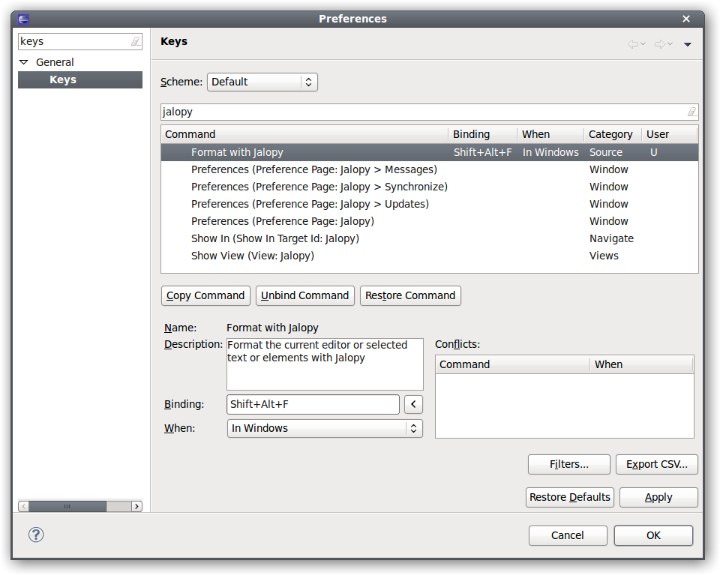
The Format with Jalopy action can also be triggered via a keyboard shortcut. The default keyboard accelerator is Ctrl+Shift+F10, but it is recommend to re-configure the shortcut to something more accessible. To change the binding, open the Eclipse Keys preference page via the application menu, Window → Preferences → General → Keys (on Mac OS X, it’s Preferences... → General → Keys), and enter “Jalopy” in the search field to display the Jalopy related actions. Select Format with Jalopy and adjust the binding as desired. Shift+Alt+F would be a good choice, but is already used with the default scheme. You would have to either unbind it or re-configure the original action, before you can use it for Jalopy.
Please be aware that the shortcut works globally, but is mapped to different actions depending on the current context and therefore might yield different results when used in different views. In the Package Explorer, the shortcut might trigger formatting of a whole project, while in the Outline view only the selected element of the current file is formatted. Please make sure that you are in the desired context and have the desired elements selected when pressing the shortcut.
Describes how the plug-in integrates into the Eclipse IDE.
The software naturally adds new menu items to the menu bar and pop-up menus of different editors and views to be able to trigger formatting manually, but also allows automated formatting.
Format on Save
While manual formatting can become quite a habit, it may be best to automatically ensure proper formatting in order to free developers from the burden to keep their code always in compliance with the company rules. Jalopy provides a Format on Save feature to have formatting automatically applied whenever a dirty file is saved. To activate Format on Save, open the Jalopy preferences and enable the corresponding option as described in Section 2.2.3, “Format on Save”.
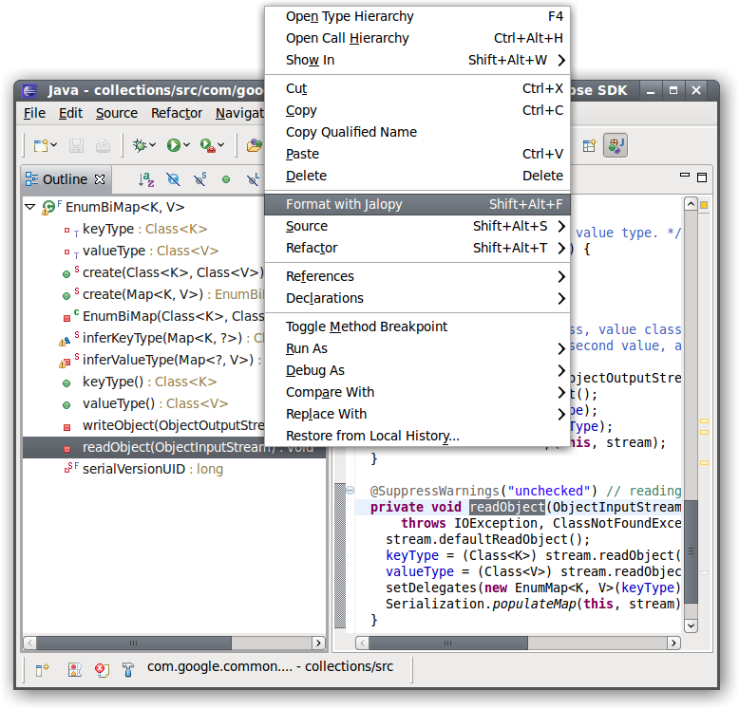
Editor pop-up menu
To format the currently active editor, open the pop-up menu by right-clicking with your mouse or pressing the Shift+F10 keyboard shortcut, and select the “Format with Jalopy” item.
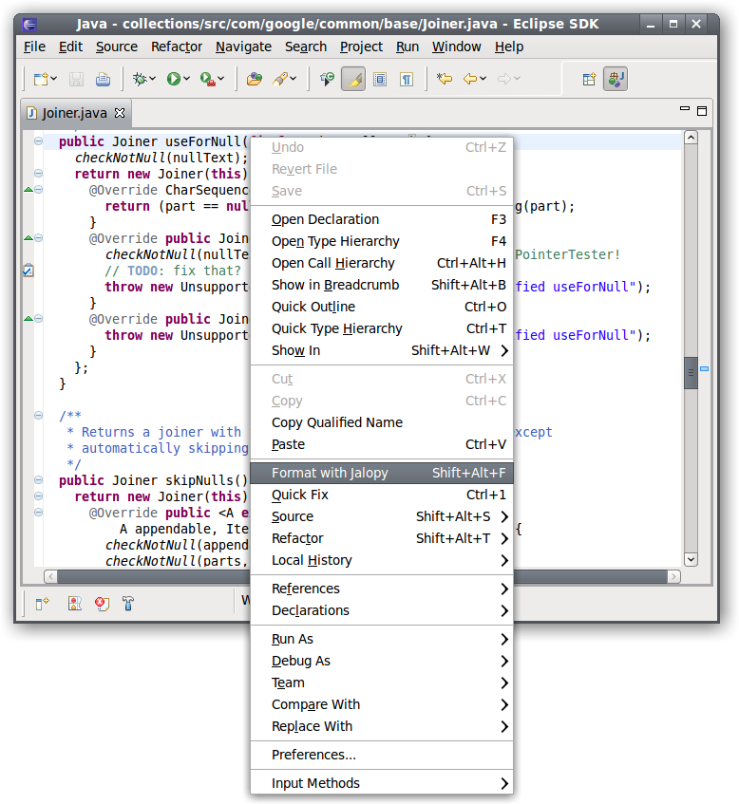
If there is some text selected in the editor, only this section will be formatted (selective formatting). This can be helpful when editing portions of very large files, as selective formatting can speed up processing considerably. It comes especially handy when you want to limit formatting to a specific file portion in order to avoid unnecessary differences when editing a file that has not (yet) been formatted according to the company code conventions.
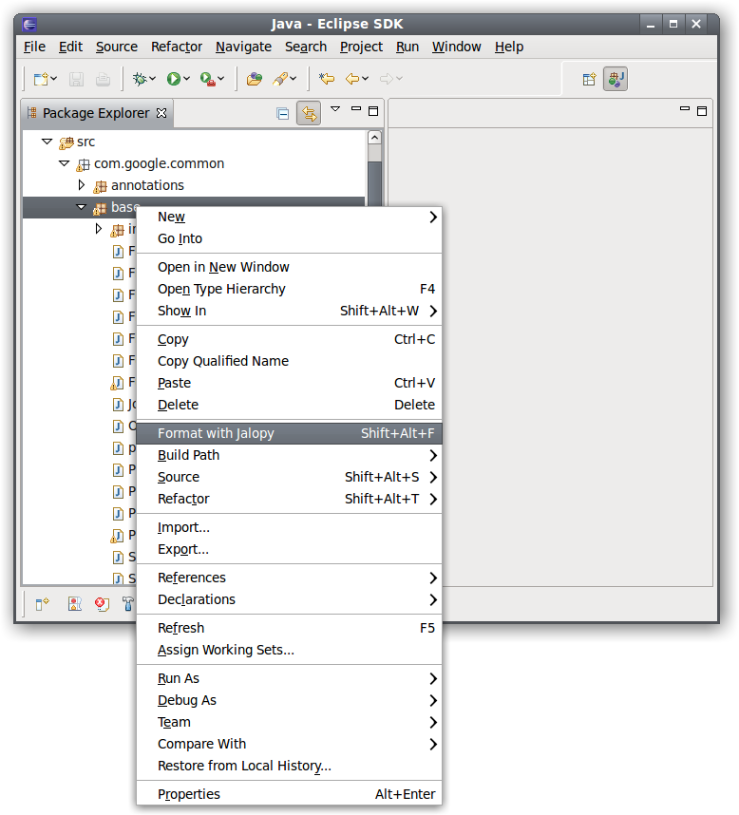
View pop-up menus
The action is also available through the pop-up menus of different views like the Navigator and Package Explorer views. To format files, select the element that should be formatted, open the pop-up menu and choose the “Format with Jalopy” item. Depending on the selected element, the action triggers formatting for whole working sets, projects, folder and package hierarchies, or only one or several source files.
Package Explorer pop-up menu
Formatting is done in the background if the corresponding workspace option is enabled (available through Window → Preferences → General → Always run in background). Jalopy locks all source files that will be formatted during a run and unlocks them as soon as they were formatted. Locked editors are displayed with a gray veil to indicate locking that vanishes as soon as formatting is done for the file. This way you can continue coding while formatting takes place, but you shouldn’t perform huge tasks like refactoring etc. that might interfere with the workspace update.
Outline pop-up menu
Similar to selective formatting in the editor which allows to limit formatting to arbitrary code sections, it can be useful to be able to limit formatting on a more structural level. Jalopy therefore integrates with the Outline view where you can select the single code element (field, method etc.) that should be formatted exclusively.
Code Clean Up
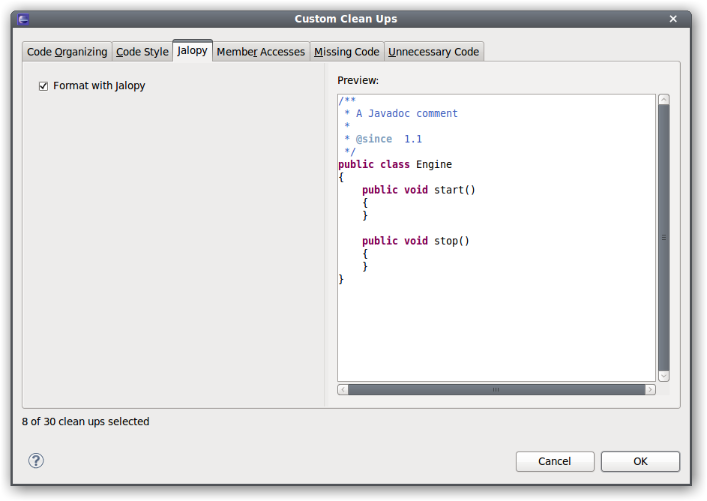
Jalopy integrates with the Eclipse Code Clean Up infrastructure to let you perform formatting as part of your clean up routine. To enable formatting during clean up, open the Eclipse Clean Up settings page, select a profile, press the Edit... button and go to the Jalopy tab to enable the “Format with Jalopy“ option. The preview uses the current Jalopy profile.
Since 1.9.4
Please note that Jalopy can perform many things much in the same way as individual clean ups. You should make sure that you only enable such actions either in Jalopy or in Eclipse in order to avoid unnecessary runtime overhead. Especially import optimization is costly.
Table 6.1. Features available with both Jalopy and dedicated Clean Ups
| Section | Option | Remarks |
|---|---|---|
| Code Organizing | Remove trailing whitespace | Implicitly done as part of formatting |
| Organize imports | Seems to be faster with Jalopy | |
| Sort members | Much more flexible with Jalopy | |
| Code Style | Use blocks in if/while/for/do statements | Jalopy also supports switch blocks |
| Use parentheses in expressions | ||
| Use 'final' where possible | Only for parameters and local variables | |
| Missing Code | Add missing Annotations | Only available for @Override |
| Add serial version ID | ||
| Unnecessary Code | Remove unused imports | Implicitly done as part of import optimization |