Describes the installation and usage of the Jalopy JBuilder OpenTool. JBuilder was a powerful Java standalone IDE that—depending on the flavor—speeded Enterprise JavaBeans, Web, Web Services, XML, mobile and database application development with two-way visual designers and rapid deployment to leading J2EE application servers. The product has been discontinued by Borland and was retargeted to the Eclipse platform with CodeGear JBuilder 2007.
The Plug-in only works with JBuilder versions up to 2006. For a JBuilder 2007 or later compatible Plug-in, you need to install the Eclipse Plug-in. Please refer to Chapter 6, Eclipse Plug-in for detailed information
Explains the steps involved to install the JBuilder Plug-in.
The JBuilder Plug-in requires JBuilder 5.0 or higher. See Section 1.1, “System requirements” for the basic requirements to run Jalopy.
The Plug-in comes as an executable Jar Archive (JAR) that contains a graphical setup wizard to let you easily install the software. Wizard installation is recommended and explained in detail in Section 1.3, “Wizard Installation”.
If you would rather install the Plug-in manually, you have to decompress and copy the appropriate files into the different application and/or settings folders. To decompress the contents of the installer JAR, you can often use the build-in support of your file manager (e.g. Nautilus) or any other software that can handle the ZIP compression format (e.g. 7Zip, WinZip or Stuffit Expander). If you don’t have access to one of the convenience tools, you might resort to the jar command-line application that ships with your Java distribution.
If you’re upgrading from a prior version and want to keep your settings, first
copy or rename the current Jalopy settings directory to match the version number
of the new release. For instance, if your current settings directory is
C:\Documents and Settings\John Doo\.jalopy\1.9
and you’re about to install Jalopy 1.9.3, either copy the directory
contents or rename it to
C:\Documents and Settings\.jalopy\John Doo\1.9.3.
Wizard installation can perform this step automatically.
Make sure JBuilder is not running and remove any prior Jalopy JAR files from
your JBuilder extension folder. The JBuilder extension folder is located under
the root directory of your JBuilder installation, e.g.
C:\Program Files\JBuilder\lib\ext.
Remove all JAR files starting with jalopy-.
Now decompress the contents of the installer JAR file into a temporary
directory and copy the two JAR files
jalopy-1.9.3.jar and
jalopy-jbuilder-1.9.3.jar
from the temporary directory into the JBuilder extension folder.
Describes how the Plug-in integrates into JBuilder.
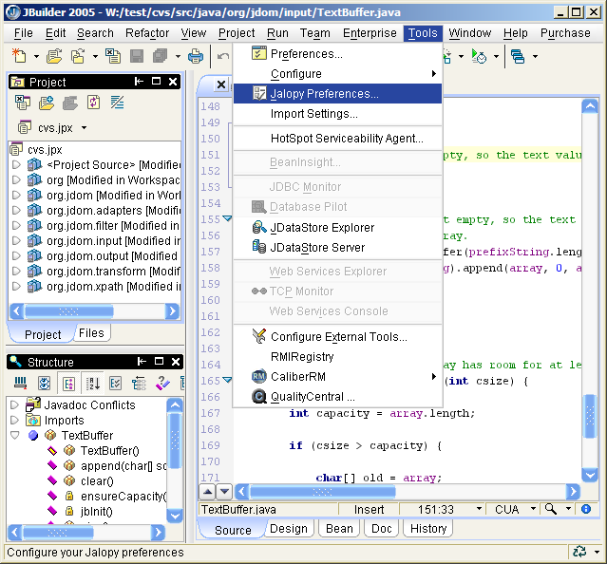
The software adds two new menu items into the main menu of the AppBrowser:
Tools → Jalopy Preferences....
Displays the Jalopy preferences dialog. Use this item if you want to configure your settings to control the layout of any formatted code.
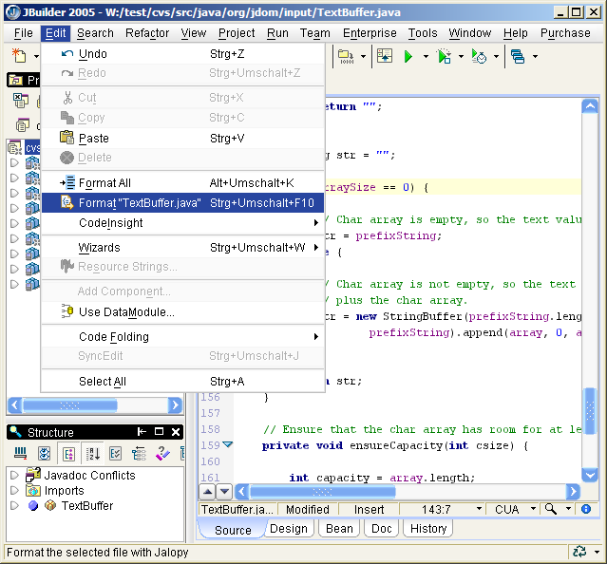
Project → Format <File>
Formats the current editor view. Use this item if you need to format the currently opened file. The item is only available if there is an open view that contains a Java source file.
There will also be a new menu item available at the end of the pop-up-menu of the Project pane: Format. Use this item if you want to format several files at once. All currently selected files are formatted.
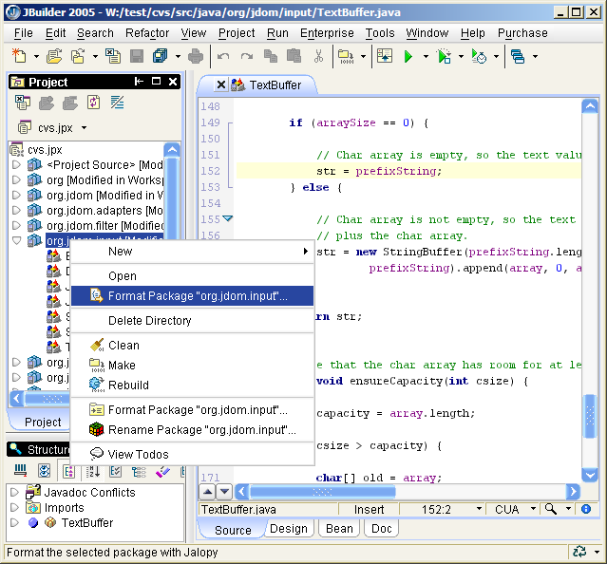
If it happens that a file has an open editor view, this view will be updated, not the actual file. You have to save the view first to see the physical file updated.
The software adds a new menu item to the pop-up menu of Java editors.
Format with Jalopy
Formats the contents of the editor. When currently some text is selected in the editor, only the selected text will be formatted (selective formatting). This can be especially helpful when editing portions of very large files, as selective formatting can speed up processing considerably. But comes especially when you want to limit formatting to a specific file portion in order to avoid unnecessary differences when editing a file that has not (yet) been formatted according to the active code convention.

Jalopy displays all runtime messages in the message pane. Messages are shown in a tree control, with each branch containing the messages for a specific file, and individual messages displayed as leafs. File messages show the number of leaves and the warning and error count.
The message types are differentiated with icons and by color: Errors are red with an error icon, warnings are shown in blue and display a warning sign, informational messages are black and carry a file icon and debugging messages are black and prepended by a bug icon.
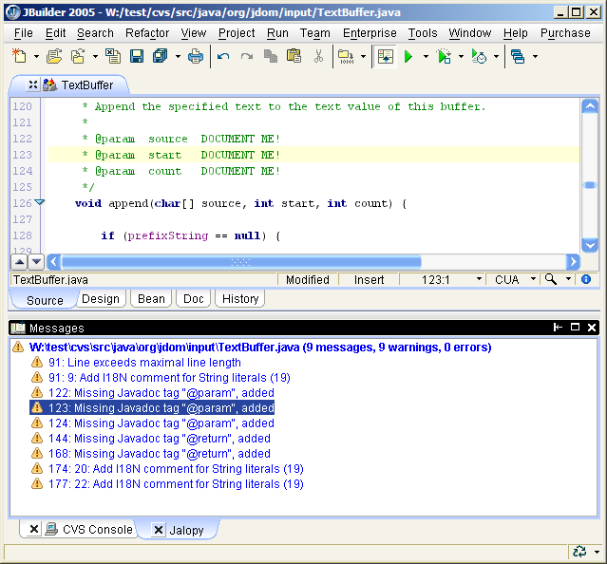
Clicking on a file name will open that file, clicking on a message that contains location information will open the file containing the message and move the caret to the nominated location.
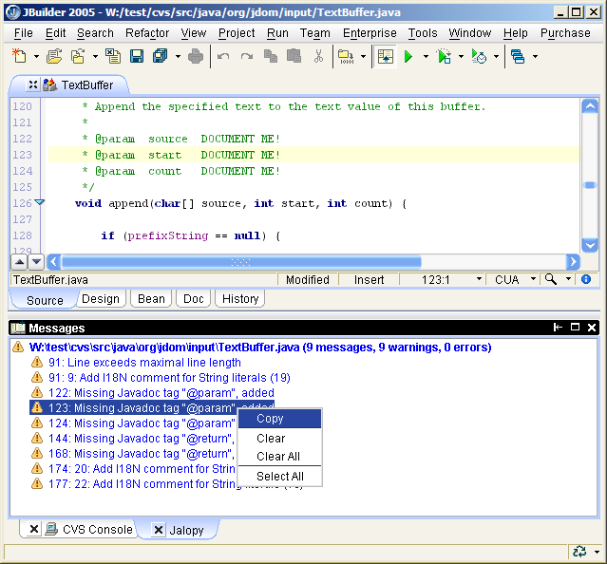
The window provides a context menu with some useful actions.
| Copy | Copies the textual contents of the selected messages into the System clipboard. If a message contains children, the contents of all children are copied as well |
| Clear | Removes all selected messages |
| Clear All | Removes all messages currently being displayed in the window |
| Select All | Selects all messages currently being displayed in the window |
Although Jalopy ships with sensible default settings (mimicking the Sun Java coding convention), you most likely want to configure the formatter to match your needs (adding copyright headers, tune Javadoc handling and the like). For such, Jalopy comes with a graphical configuration tool that lets you interactively customize the settings. See Chapter 2, Configuration for an in-depth discussion of the available options. Please refer to Section 8.2, “Integration” for information on how to display the configuration tool from within JBuilder.